3. Installing WordPress Plugins
Installing plugins is a great way to increase the functionality of your site. It’s also very easy, once you get the hang of it.
WordPress plugins can be installed in several ways:
- Free plugins from the official WordPress repository can be installed via Plugins > Add New in your wp-admin area.
- Any plugin can be installed by uploading it as a zip archive via Plugins > Add New > Upload in your wp-admin area.
- Plugins can be installed via FTP (with a client like FileZilla.)
WPMU DEV plugins can also be installed via our Dashboard plugin, installed automatically on your registered sites via our project pages, or downloaded and installed via FTP. Find out more in the Installing WPMU DEV Plugins section of our documentation.
Visit the new Plugins manager in your Hub to install, delete, activate or deactivate any plugins from WPMU DEV or wordpress.org, on any or all of your connected sites.
The Safari browser automatically unzips archive files that you download to your computer. This means that any .zip plugin file you download is automatically unzipped and must be zipped again before you can upload it to your WordPress site. You can change this default behavior though by following this guide.
3.1 Tips when installing new plugins
Copy chapter anchor to clipboardYou should always install plugins from trusted sources. All WPMU DEV plugins are ‘Guaranteed To Work’ according to their listed compatibility with the latest versions of WordPress, Multisite and BuddyPress.
While there are thousands of WordPress plugins, many of these don’t work on WordPress Multisite sites and may have compatibility issues with Multisites or the theme you are using. The plugin may also not have been updated for the version of WordPress you are using. Be sure you check the plugin’s compatibility information before installing.
Always try to activate your new plugin on a test or staging site first, without any other plugins activated, using a default theme such as Twenty Twenty, taking notes of any errors that may occur. Then activate the theme you intend to use, and any other plugins, one at a time, to check for any theme/plugin incompatibilities. Only install and activate the plugin on your live site once you have resolved all issues.
Once installed, plugins can be:
- Activated and deactivated on a per site basis inside the dashboard via the Plugins page in the Site Admin dashboard
- Network Activated or Network Deactivated via the Plugins page in the Network Admin dashboard.
Plugins can be sourced through sites such as:
- WPMU DEV
- WordPress Plugins Directory
- …and many others
3.2 Uploading a New Plugin
Copy chapter anchor to clipboardPlugins that have been downloaded in a .zip format can easily be added to your website through wp-admin. To do this, follow these steps:
1. Navigate to wp-admin>Plugins and click Add New.

2. Then click Upload plugin and choose your file to upload. Once you have selected your file, you can click Install Now.

3. After the plugin has installed, you will receive a success message. Click Activate so that you can use the newly added plugin.

3.3 Manually installing plugins using FTP
Copy chapter anchor to clipboardIt is good practice to backup your install completely before installing new plugins. Install plugins using FTP as follows:
1. Download the plugin.
2. Unzip the file to extract all of the files into a folder on your hard drive.

3. Read the Usage instructions thoroughly. Some plugins involve uploading PHP files and folders to a range of different locations.
- Plugins obtained from sources such as the WordPress Plugins Directory normally include a “readme” file inside the plugin folder. Read the “readme” file thoroughly.
- Check the website where you downloaded the plugin from for any additional instructions.
- WPMU DEV plugins don’t include readme or install files. Refer to the usage page where you downloaded the plugin.
4. Launch FileZilla or the FTP client you prefer (refer to these instructions if you are new to FTP).
5. Locate and open the folder on your computer that contains the new plugin.
6. Refer to the “Readme’ file or usage page (for WPMU DEV plugins) to determine which folder(s) to upload your plugin to on your install.
- Most plugins are uploaded to your plugins folder (located within the wp-content folder of your public_html folder)
- However, some plugins involve uploading PHP files and folders to a range of different locations.
7. Upload the plugin from your computer, by dragging it into the folder(s) in your WordPress directory as specified by the “Readme’ file or usage page.
3.4 Installing Mu-plugins
Copy chapter anchor to clipboardThis section covers how to add a must-use plugin to a site in three steps:
- Create an mu-plugins directory (folder) in the wp-content directory
- Create an mu-plugin php file
- Upload/install that file on a site via FTP
Mu-plugins, or ‘must use’ plugins, add features to WordPress much like other plugins, but because they are stored in a different location than conventional plugins, they have some unique characteristics.
Must-use plugins enable you to add new features & functionality to your WordPress site, or customize existing ones. Check our blog to learn more about mu-plugins and their features.
Both conventional plugins and mu-plugins are located in the wp-content folder, but mu-plugins are located in their own directory called, (surprise!) mu-plugins. As a result, mu-plugins:
- Are not activated or deactivated like other plugins. Once added to the mu-plugins folder, an mu-plugin is “always on” until it is removed from that folder.
- Are loaded before normal plugins.
- Do not work with activation, deactivation or uninstall hooks.
- Do not update automatically, and WordPress doesn’t notify you about new versions. This means that you have to keep them up-to-date manually.
- While mu-plugins work on both single and multisite WordPress installations, it is important to note that on multisite networks, mu-plugins apply to every site in the network.
3.4.1 Create an mu-plugin directory
Link to chapter 4Before you can install mu-plugins you need to create a mu-plugins folder in wp-content using an FTP client.
WPMU DEV members will likely find that the mu-plugins folder already exists, but it’s wise to verify that fact before proceeding.
If you are new to FTP, our Introduction to FTP and using FTP clients may be helpful.
Access your site via FTP and locate the wp-content folder. Right-click the folder and click Create Directory.
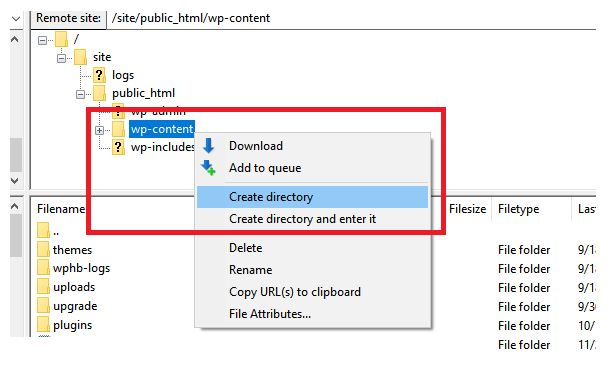
Add the directory name mu-plugins and click OK.

Right click on your new mu-plugins directory and select File Permissions.

Set the file permission to 755 and click OK.

3.4.2 Create the mu-plugin file
Link to chapter 4This section covers how to manually create and add an mu-plugin php file to the mu-plugins directory using an SFTP client.
As always, begin by creating a backup of the applicable site or network. Click the Backups option of the site in the Hub to create a backup.

Open your SFTP or SSH client. This guide uses Filezilla, but the process is, essentially, the same regardless of the FTP application being used.
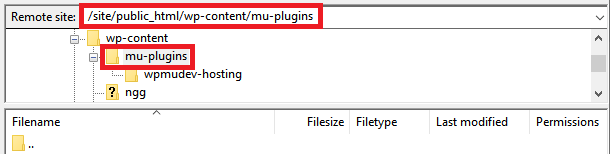
Access the site’s filesystem, locate and open the mu-plugins directory within the wp-content folder. If the default location has not been modified, the path will be: site/public_html/wp-content/mu-plugins.
If no mu-plugins folder exists, see the Creating a mu-plugins folder section of this guide.
Create a php file inside the mu-plugins folder and edit it with your preferred text or code editor.
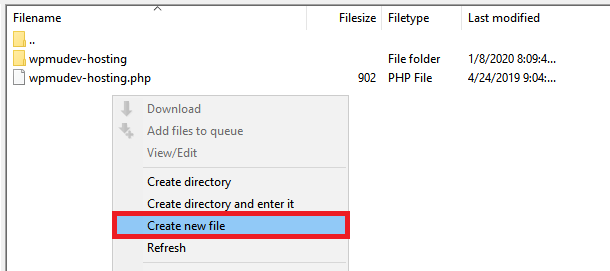
Open the file and place the necessary php code and hooks within it.
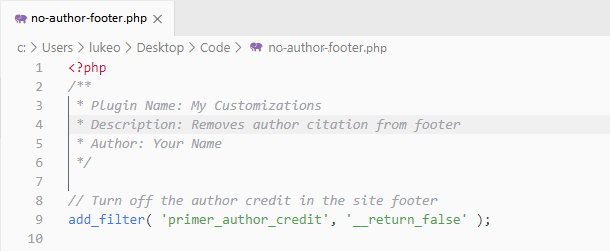
Below is an example of a simple php function that prevents the author block from appearing in the footer. After the opening php tag, <?php, it is a good idea to identify the plugin by name, provide a description and the author’s name.
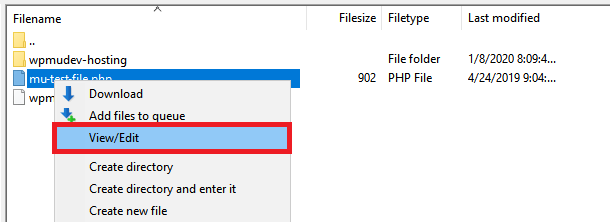
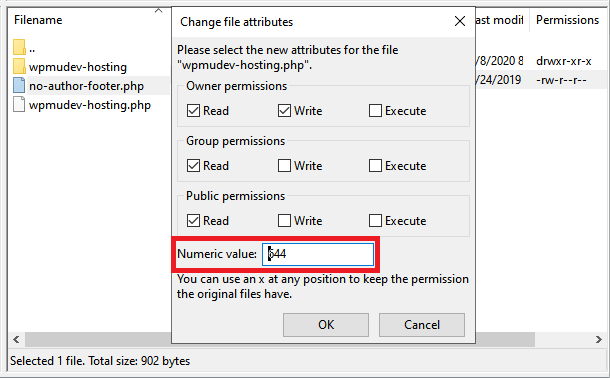
Save the file, but before uploading it, verify that the File Permissions are set to 644. Do this by right-clicking the file name, selecting the File Permissions option and checking the Numeric Value field to ensure it contains the number 644.
3.4.3 Upload/Install the file
Link to chapter 4Access your site via FTP client and open the mu-plugins directory within the wp-contents folder.

Select the PHP file(s) from the mu-plugin folder on your computer and drag it into your wp-content/mu-plugin folder in your FTP client.
Once the copied files have finished transferring to the server, the mu-plugin should be activated on your site. Mu-plugins appear under the Must-use tab on the plugin page, Admin>Plugins>Must-use.
Finally, open the site’s WordPress Plugins manager, and select the Must Use plugins filter to view a list of the mu-plugins installed on that site.
The newly installed mu-plugin will be displayed if the process was successful.

3.5 Get Support
Copy chapter anchor to clipboardIf you still have questions or need assistance after reading this document, please don’t hesitate to contact our support superheroes using the available options under the Support tab in your Hub or via the Support tab in your WPMU DEV Dashboard.


